![]()
Ploopy Classic Trackball Review
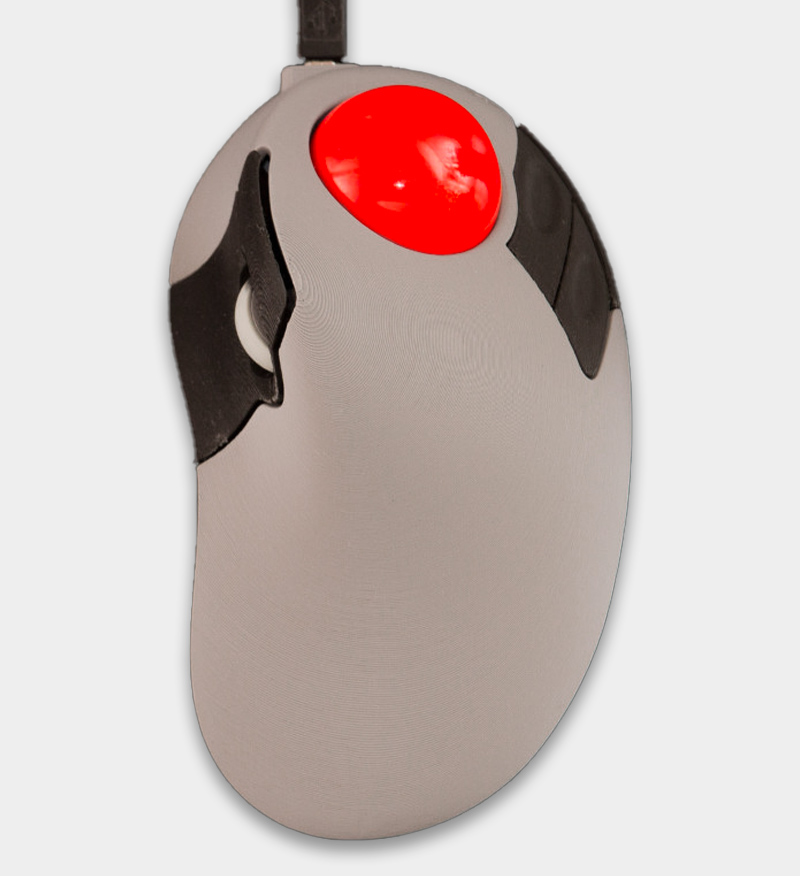
Fully assembled model
![]()
![]()
 LOWEST PRICE:
$100 (CA$ 139.99) »
SUMMARY: The Ploopy Classic is inspired by the Microsoft Explorer but offers lots of new and exciting features: a high-end tracking sensor, different color options, open source software, and a do-it-yourself or pre-assembled model. The Ploopy won me over instantly and hasn’t left my desk since I got it. Be prepared to be impressed!
OUR VERDICT: ![]() Read full review below
Read full review below
| $155 (CA$209) Assembled | ||
| $100 (CA$145) Kit |


Thanks to Ploopy for sending me this fully assembled Ploopy Classic Trackball.
I’m using the Ploopy Classic Trackball with a 2022 Apple Mac Studio and Apple Studio 27” Display.
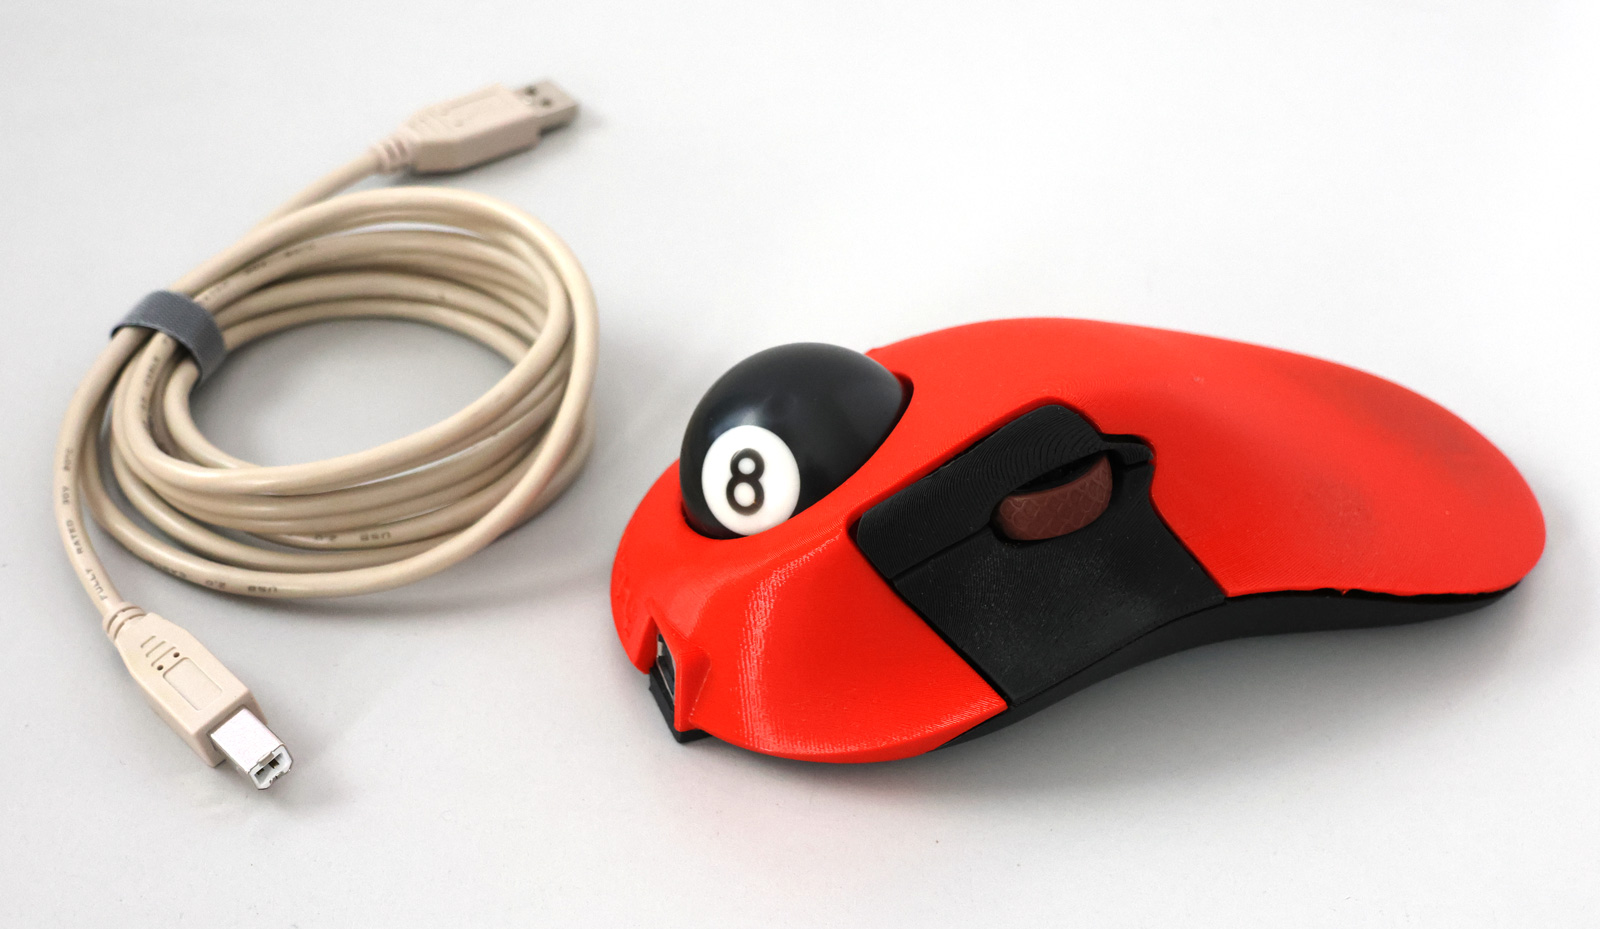
The Ploopy Classic Trackball comes with a USB cable.
photo © TrackballMouse.org
There’s one thing that can make your computer life a lot better: the trackball mouse. For over 25 years I have tried almost every trackball available and a few of these became my favorites: the Kensington Expert, SlimBlade and the CST2545 (now X-keys L-Trac).
But something NEW arrived on my desk recently. A Ploopy Classic Trackball.
Although, new… in a way it’s not new at all. The design is based on the iconic and much-loved (among Trackball aficionados) Microsoft Trackball Explorer. The Explorer has been discontinued for many years now, but still has a die-hard following and mint-in-box specimens can fetch high prices on eBay.
Even though the Explorer is a well-loved trackball, it has a few issues. One is that it is old and the components are breaking, the bearings become less smooth and the plastic is becoming brittle. They’re difficult to fix if they break. Plus there’s not a dedicated software to customize its functionality.
Enter the Ploopy Classic.

The Ploopy Classic design is based on the Microsoft Explorer Trackball
photo © TrackballMouse.org
While the Ploopy Classic design is based on the Microsoft Explorer, this new trackball overcomes many of the Explorer’s shortcomings and adds many features and a quality that an Explorer fan would appreciate.
So let’s take a look at this trackball: how does it compare to the old Explorer? How does it shape up against its more current competition? And let’s dive into the many unique selling points of the Ploopy brand (oh yes, Ploopy does more than just this Classic Trackball, visit their site for the more trackballs and other products).
About Ploopy
Rewind to a few months ago when I had a really nice Zoom call with the founders of the Ploopy company: brothers Phil and Colin Lam. These two guys are very much dedicated to and passionate about creating not only the best trackballs but also adding really unique features that some of the big trackball companies are not able to offer.
Ploopy was founded in 2019 and at the moment their line-up consists of a few different trackballs and headphones.
What makes Ploopy truly unique though, is the fact that their products are 100% open source: from the design files to the software. What does that mean? The parts of the trackballs (and the headphones) are 3D printed. The design files are available to download so you can print parts of the trackball yourself. If you want another body or button color, print it yourself. When something breaks, you can fix it yourself. And even if you can’t fix it, someone else could do it for you using available design and 3D print files or parts that you can order at Ploopy.
Ploopy also uses very high-end, quality electronics and optical tracking, even higher quality than seen on the top models from Kensington for example.
Now I’m not someone who can or wants to solder together a high-tech electronic device. Luckily Ploopy offers pre-made Trackballs that are ready to go right out of the box.
It was clear to me that I really needed to get my hands on the Ploopy Classic, their bestseller and a finger-operated trackball which is my personal favorite layout. Phil and Colin kindly offered me a Ploopy Classic for review.
Selecting a Ploopy Classic Trackball
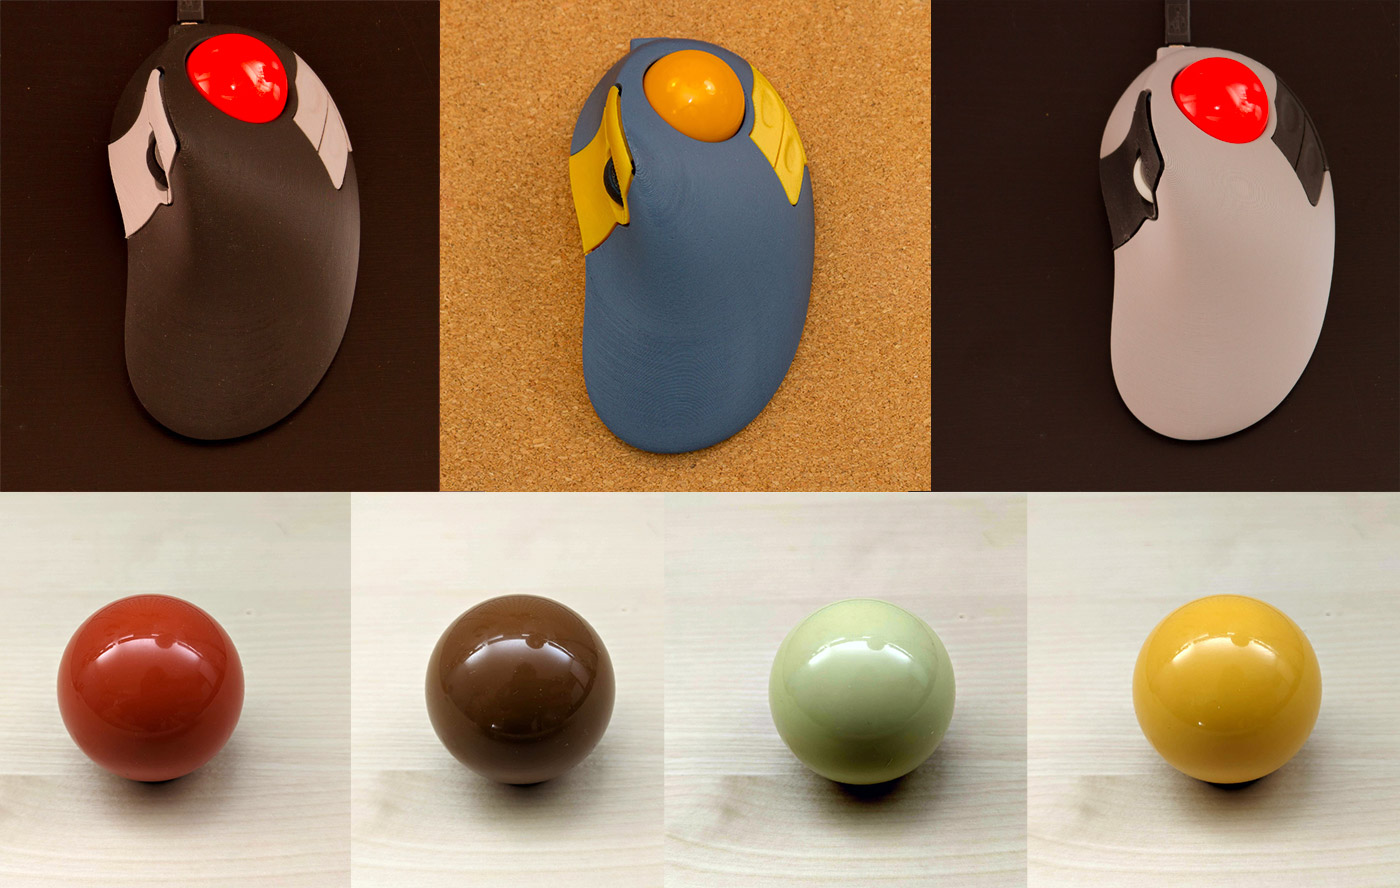
Then came the hard part. Selecting the color of my new trackball! Since the parts of the trackball are 3D printed by Ploopy, they have the ability to create dozens of color combinations. That’s right, not just 1 or 2 color options for the body, like some standard trackballs, but a large number of combinations using different colors for the buttons, top and bottom of the body. This together with a range of colors for the ball as well, you can really go crazy.
On their website I spotted a photo of a Ploopy with a bright red body, contrasting black buttons, black bottom and a nice black and white 8-ball to top it off. Now there’s an eye-catching color combo! That’s the one I ordered.
You can order a Wedge for the Classic to increase the angle and place it higher. I have it but I don’t like using it, this is a personal preference though and it’s good that the option exists.
Left-handed? No problem!
This is not an ambidextrous trackball, but the kind people at Ploopy didn’t forget about the left-handed users out there: you can order the Ploopy as a left-handed model as well. It’s a mirror copy of the right-handed trackball, so the writing and the logo are mirrored as well, but that only adds to its charm.
Price
As mentioned I have received mine from Ploopy for this review, but a fully assembled Classic will set you back $209.99 CAD (approx $155 USD or €143), while a kit that you have to put together yourself goes for $139.99 CAD (approx $103 USD or €95). This is on the higher end of trackball pricing, but looking at what you get in terms of quality electronics and design, it is well worth it.
Unboxing the Ploopy Classic Trackball
Not long after, the trackball was delivered… in rather plain packaging. Ploopy is working on more sophisticated packaging for their trackball, but when I received it, the device came sealed in a Ziploc bag, wrapped in newspaper. Nowadays that actually counts as a very sustainable way of packaging with reused and reusable materials (I reused the box, newspaper wrapping and Ziploc bag), so there’s nothing to complain about.
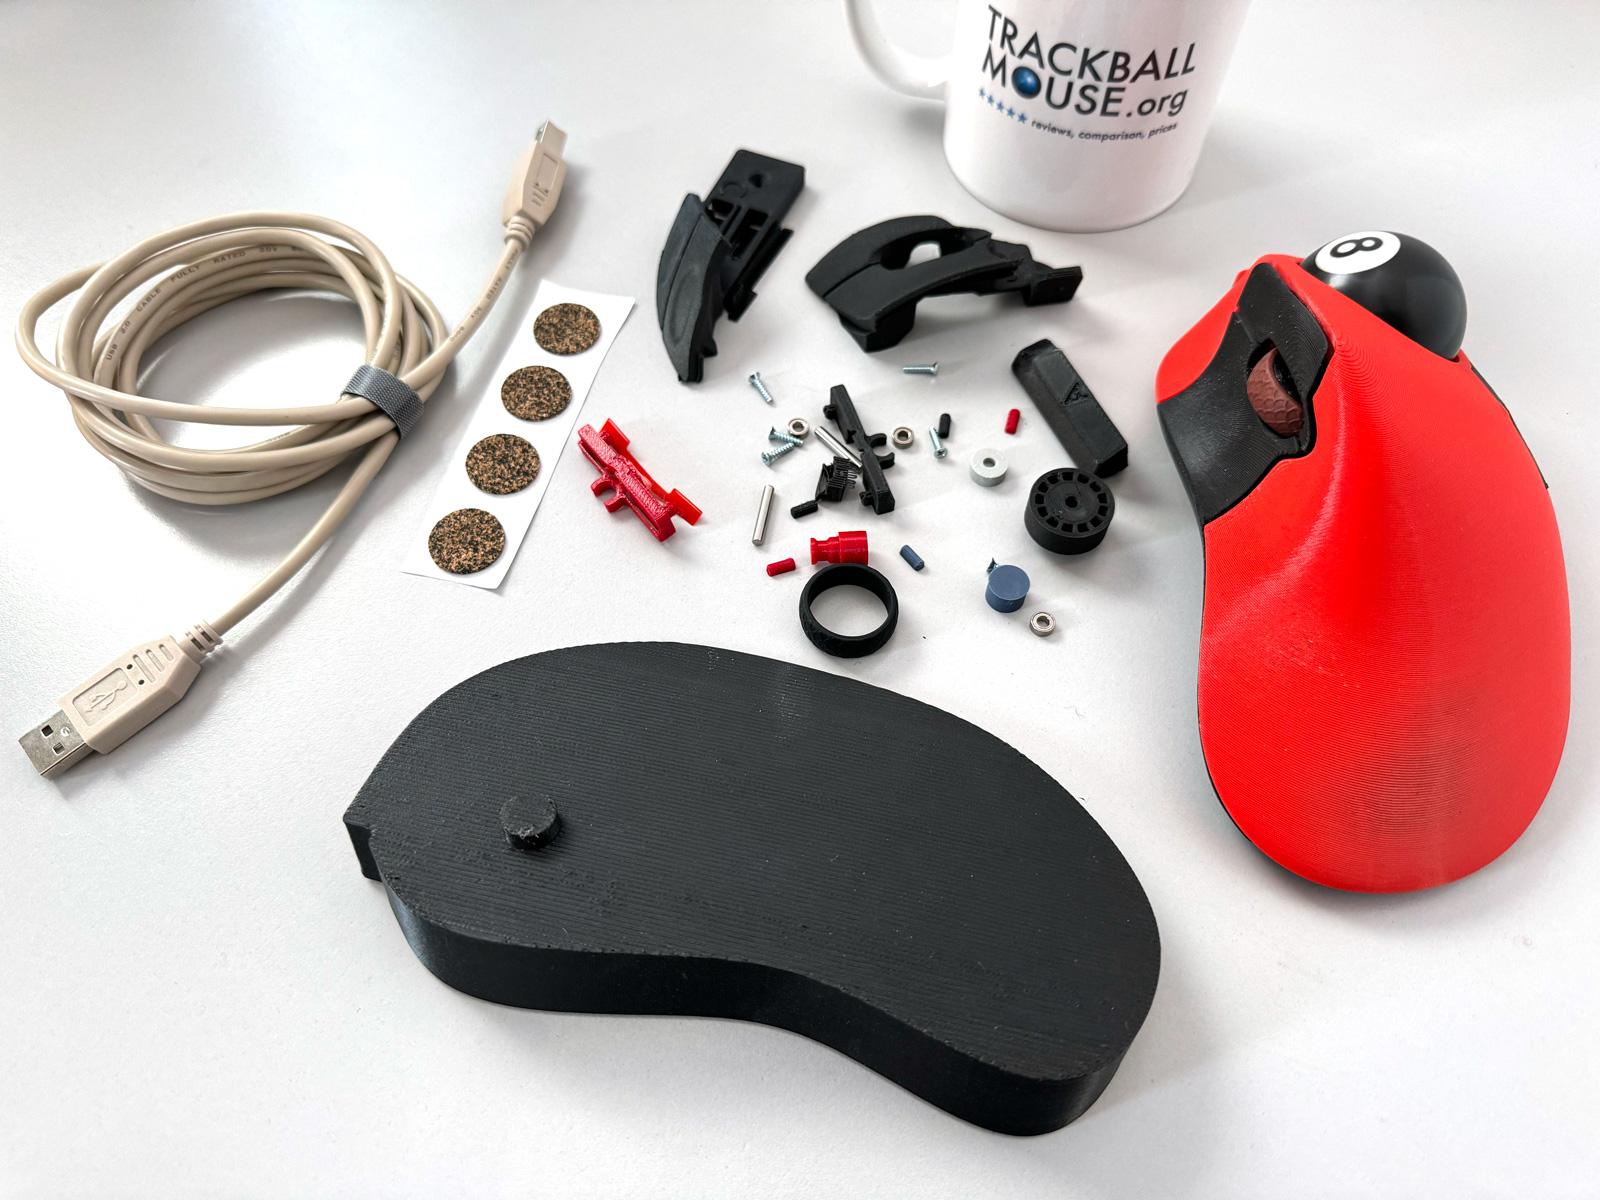
You can order a wedge and replacement parts for the Ploopy Classic trackball
photo © TrackballMouse.org
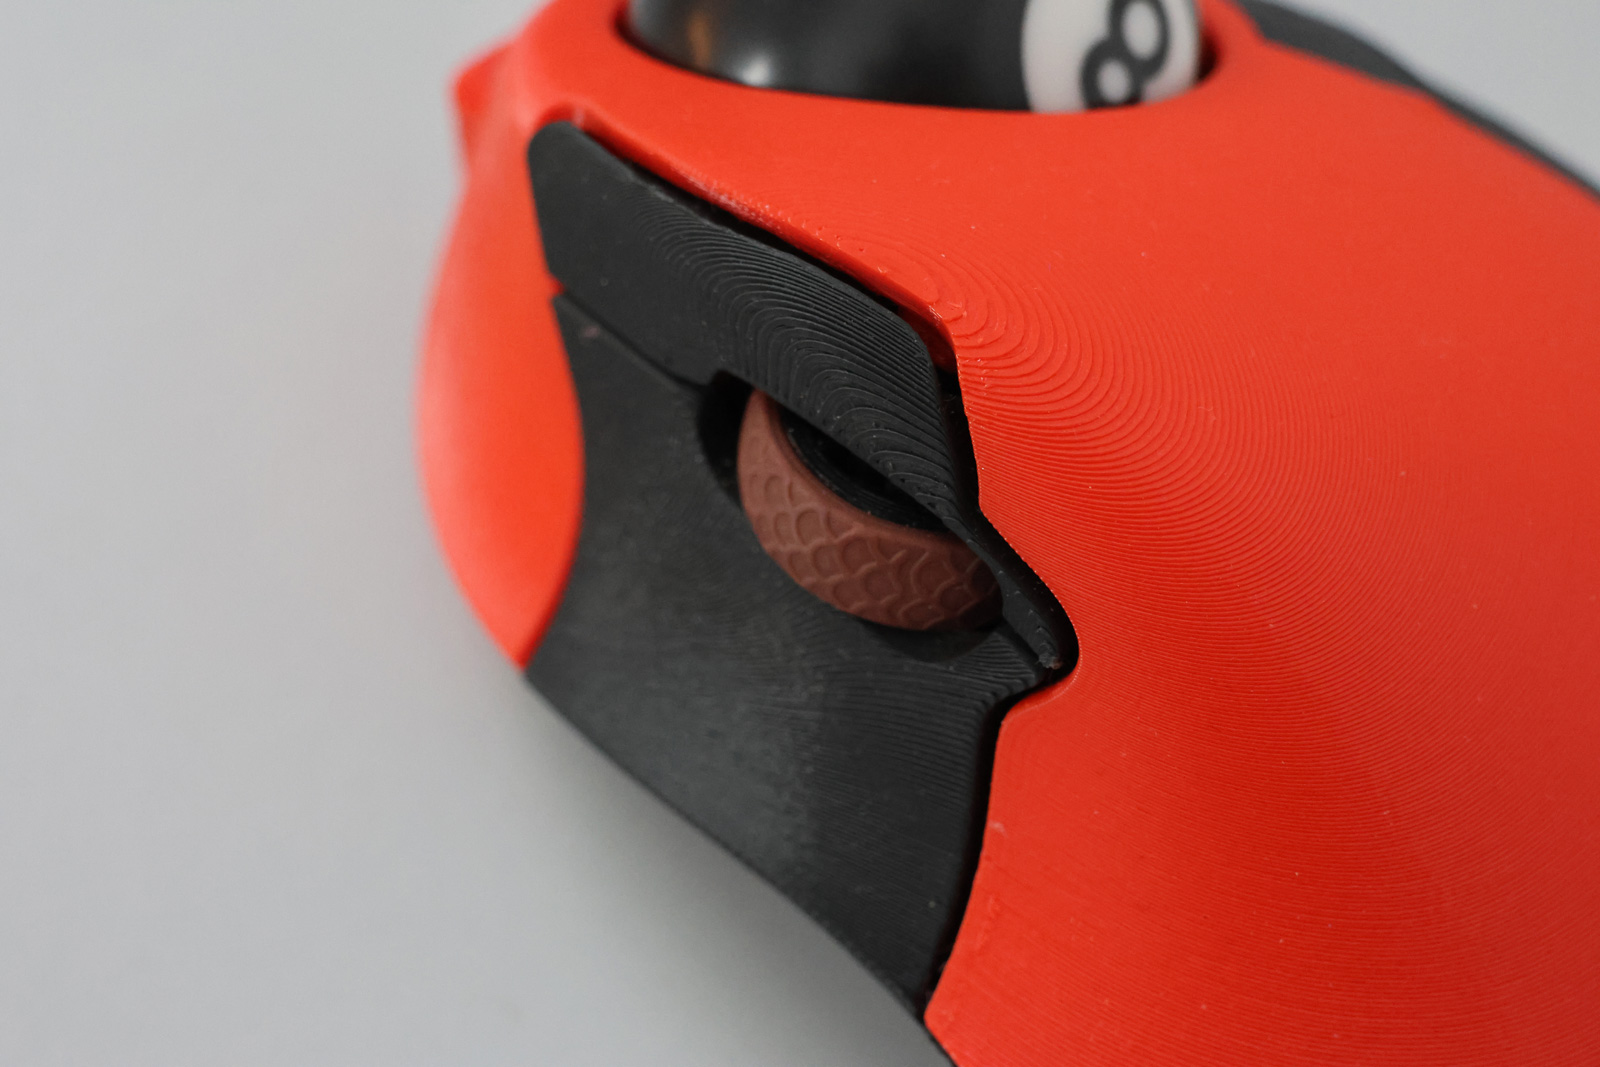
Taking the trackball out of the box, you’ll immediately notice one thing: the body feels quite rough. If you have seen or created 3D-printed objects before you will be familiar with this texture: basically lots of very thin layers of plastic printed on top of each other. This makes the device completely different from the usually very smooth and shiny bodies of most trackballs and mice.
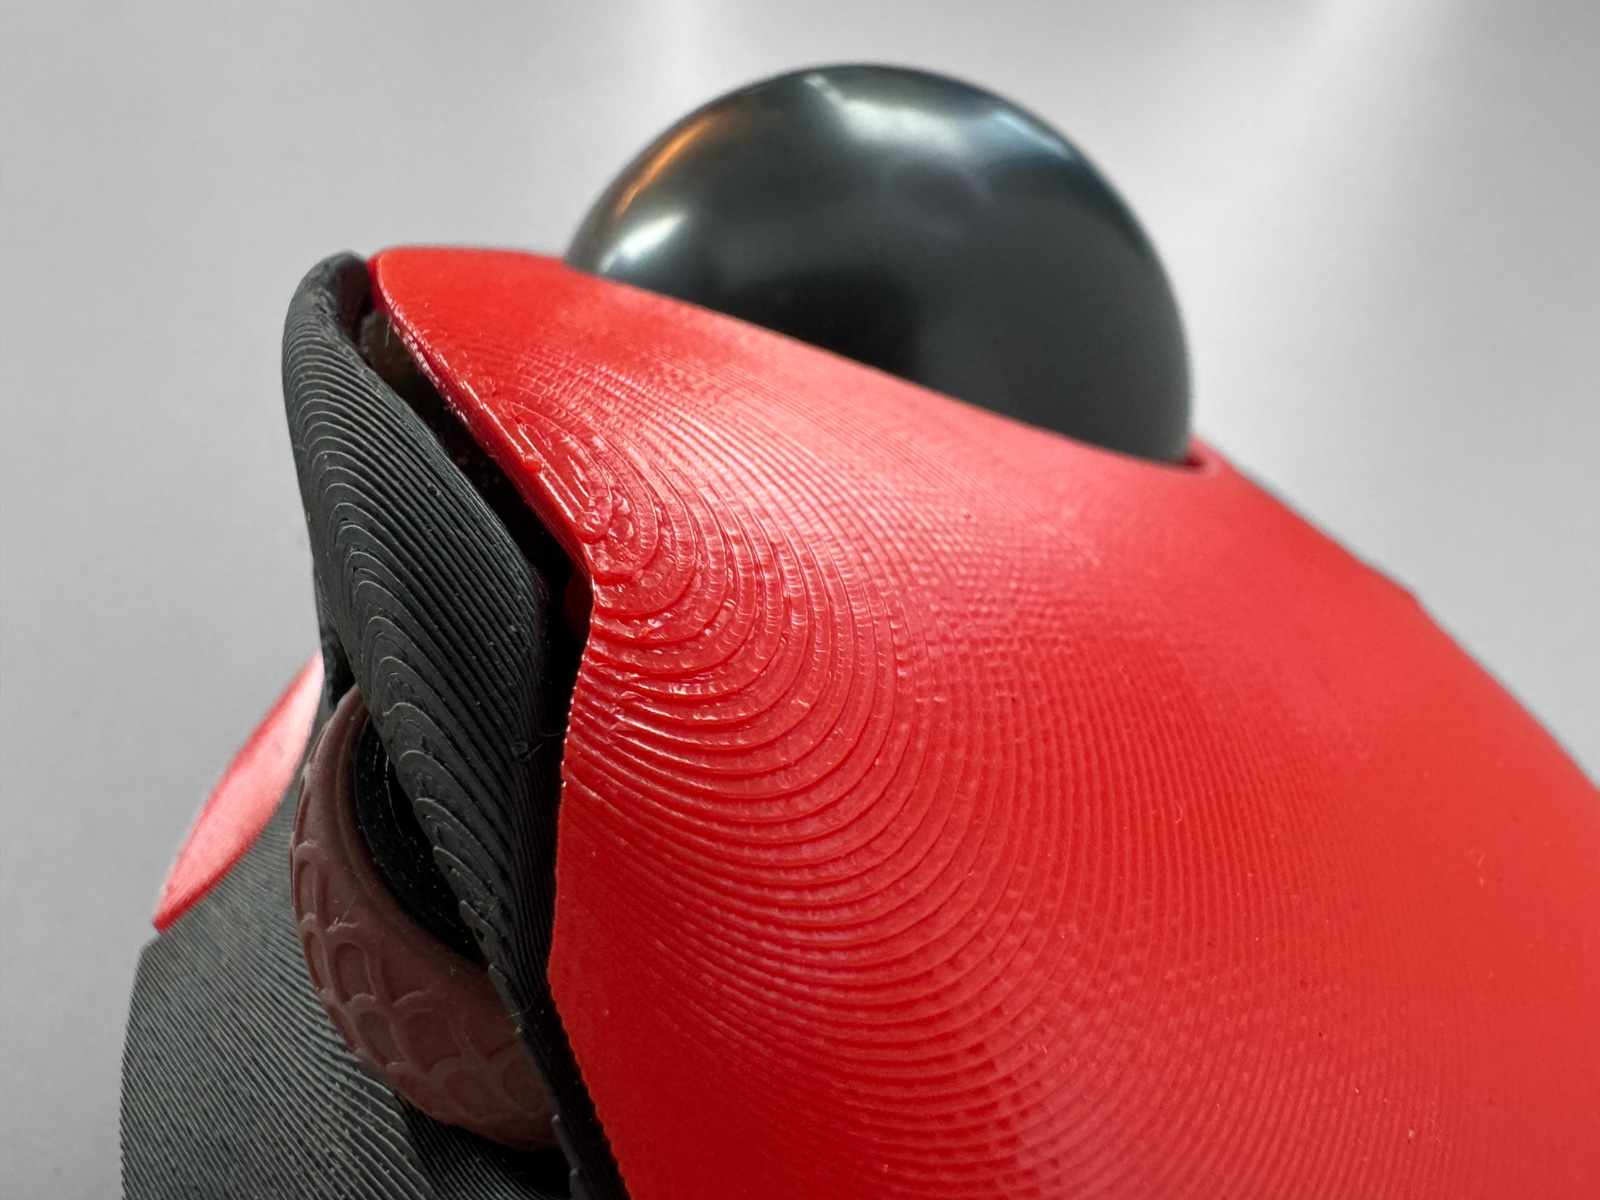
In this close-up shot, you can see the texture of the 3D-printed body and buttons.
photo © TrackballMouse.org
I also received a nice set of spare parts, available to order on the Ploopy website, which should make sure that this trackball will last for an eternity.
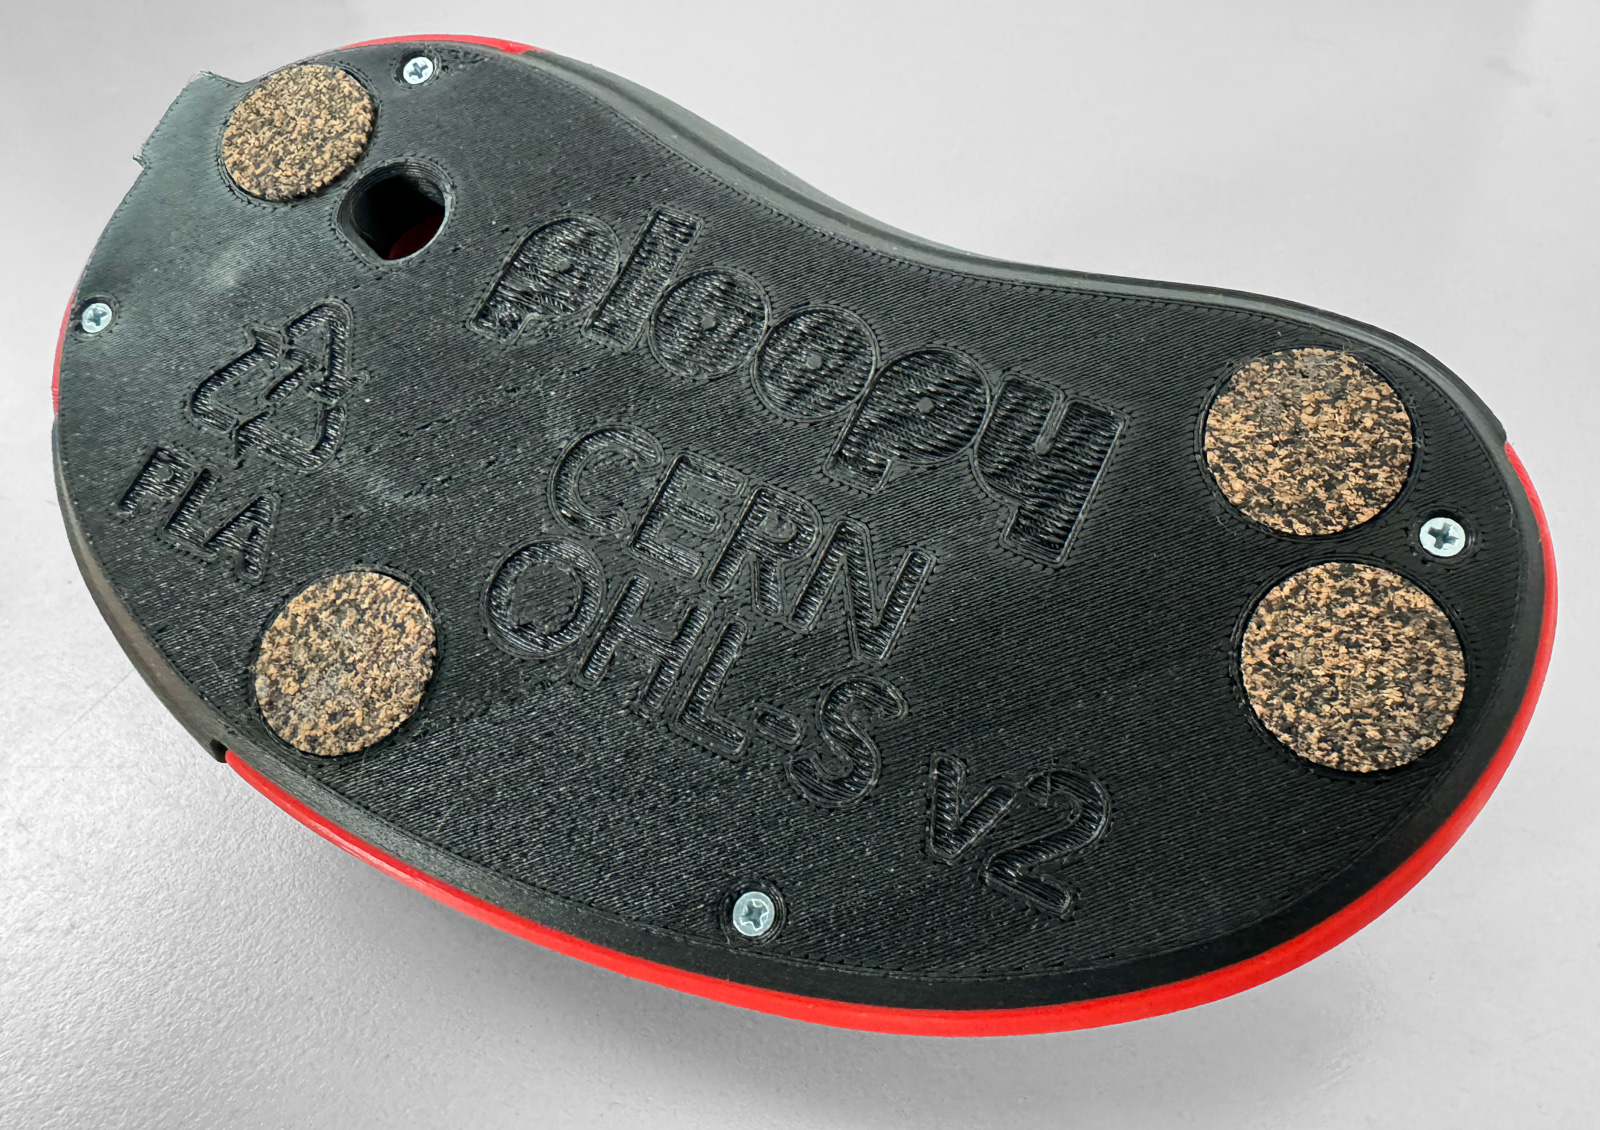
The parts of the body are 3D printed. CERN OHL-S V2 stands for CERN Open Hardware Licence Version 2
photo © TrackballMouse.org
Cable – practical, but it ain’t pretty
Lastly, there’s the USB cable. I almost forgot (after being so used to the wireless Expert and Slimblade and wireless Keychron keyboard), that I actually need a permanent cable to make the trackball work. I do think a wireless Ploopy would be a good option to have at some point. But a wired model has many advantages including a super secure connection that never fails as opposed to Bluetooth or 2.4GHz wireless connections that, let’s admit it, have regular connection failures, even if it’s only for a nano-second now and then.
The cable itself is a USB-A to USB-B cable. You know, the old-school type you use(d) for printers.
The USB-B plug kind of un-elegantly sticks out the front of the trackball since the cable is not ‘built-in’ to the device.
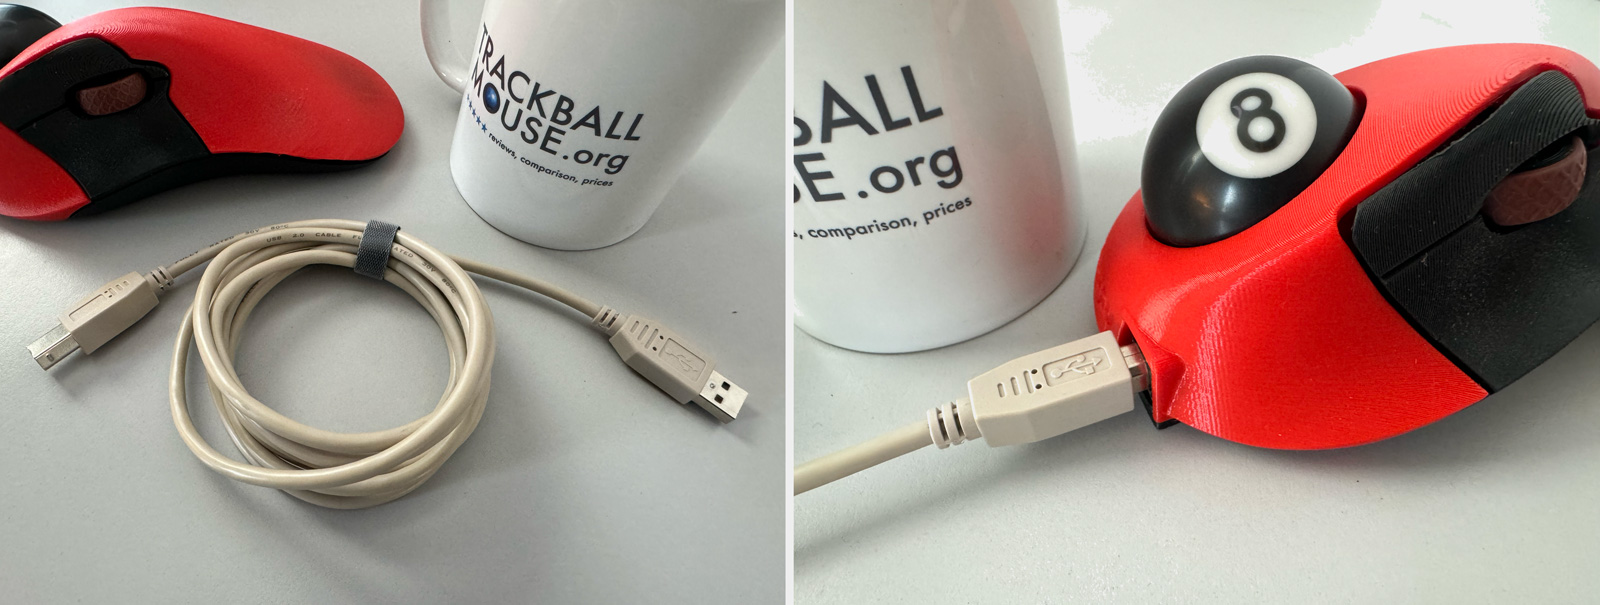
The cable that comes with the Ploopy
photo © TrackballMouse.org
One benefit of having a separate cable (and not a built-in one) is that you can swap it for another cable: perhaps you need a longer cable or perhaps you want to add another color cable.
The USB cable that comes with the Ploopy is not that pretty. It’s that old 1990s computer grey color. That doesn’t fit with my Ferrari-red and black 8-ball beauty of a Ploopy. And neither with my other devices on my desk that have either black or Apple-white cables. Luckily this is an easy fix and I ordered a black and red, cloth-covered USB cable with gold-plated connectors for a whopping $6.95 on Amazon. Now we’re talking. Nothing is too good for my new Ploopy!
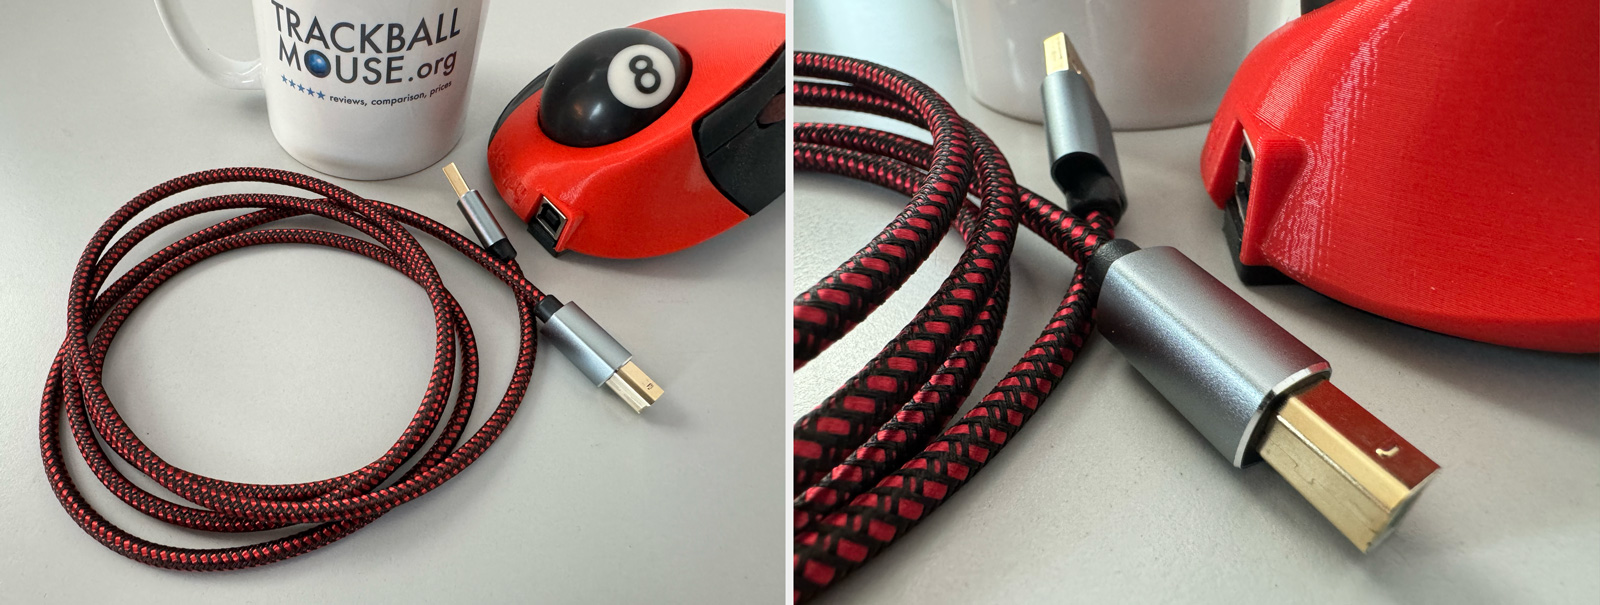
Voilá, one quick Amazon later the cable has been replaced with this great-looking cable!
photo © TrackballMouse.org
8-Ball
We have to address the extremely cool elephant in the room: the 8-Ball. Lots of you have been asking for years and years to have an 8-Ball or a 9-Ball for the Kensington Expert (as seen in Ocean’s 8) and Kensington has teased it (I received prototypes) but has so far not been able to offer this for their Expert due to technical reasons. Let’s just say it’s hard to make their 8-balls balls work properly with the sensors in the Kensington trackballs.
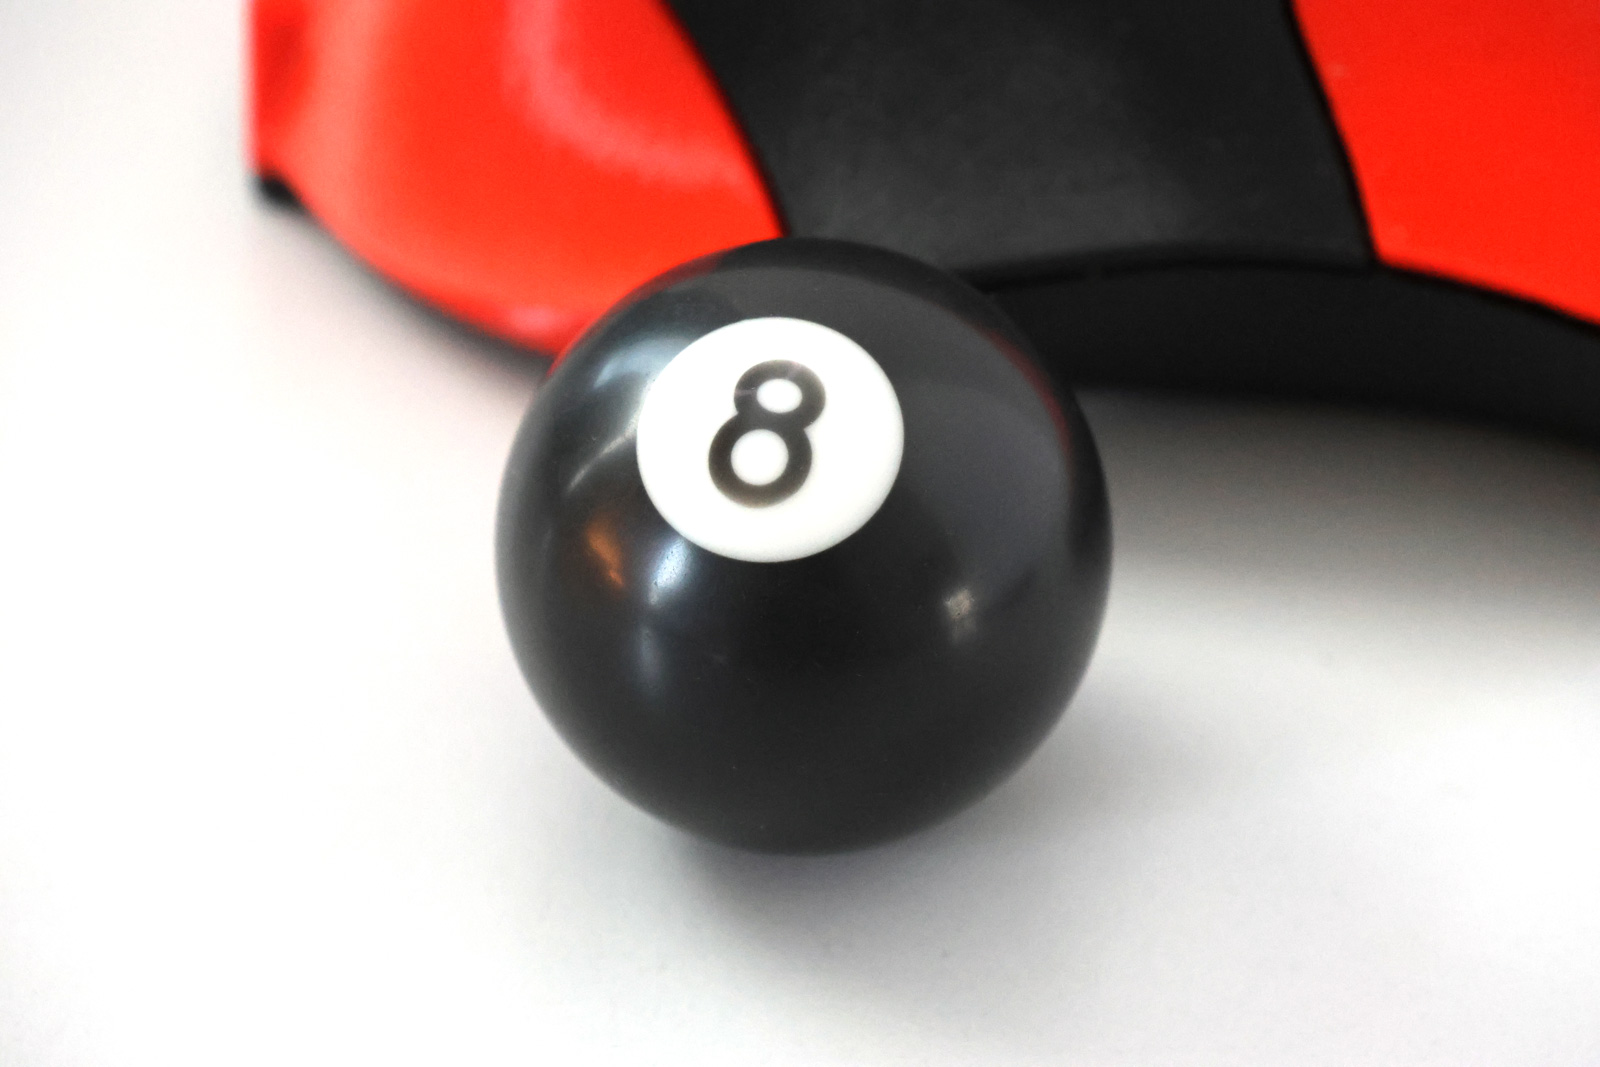
You can customize your Ploopy including the color of the ball – and even get this 8-Ball design
photo © TrackballMouse.org
But Ploopy have done it. They have created a 45mm ball (note that this is smaller than a real 8-ball and/or the Kensington Expert ball) with the black 8-ball design and it works like a charm! And it looks fantastic!
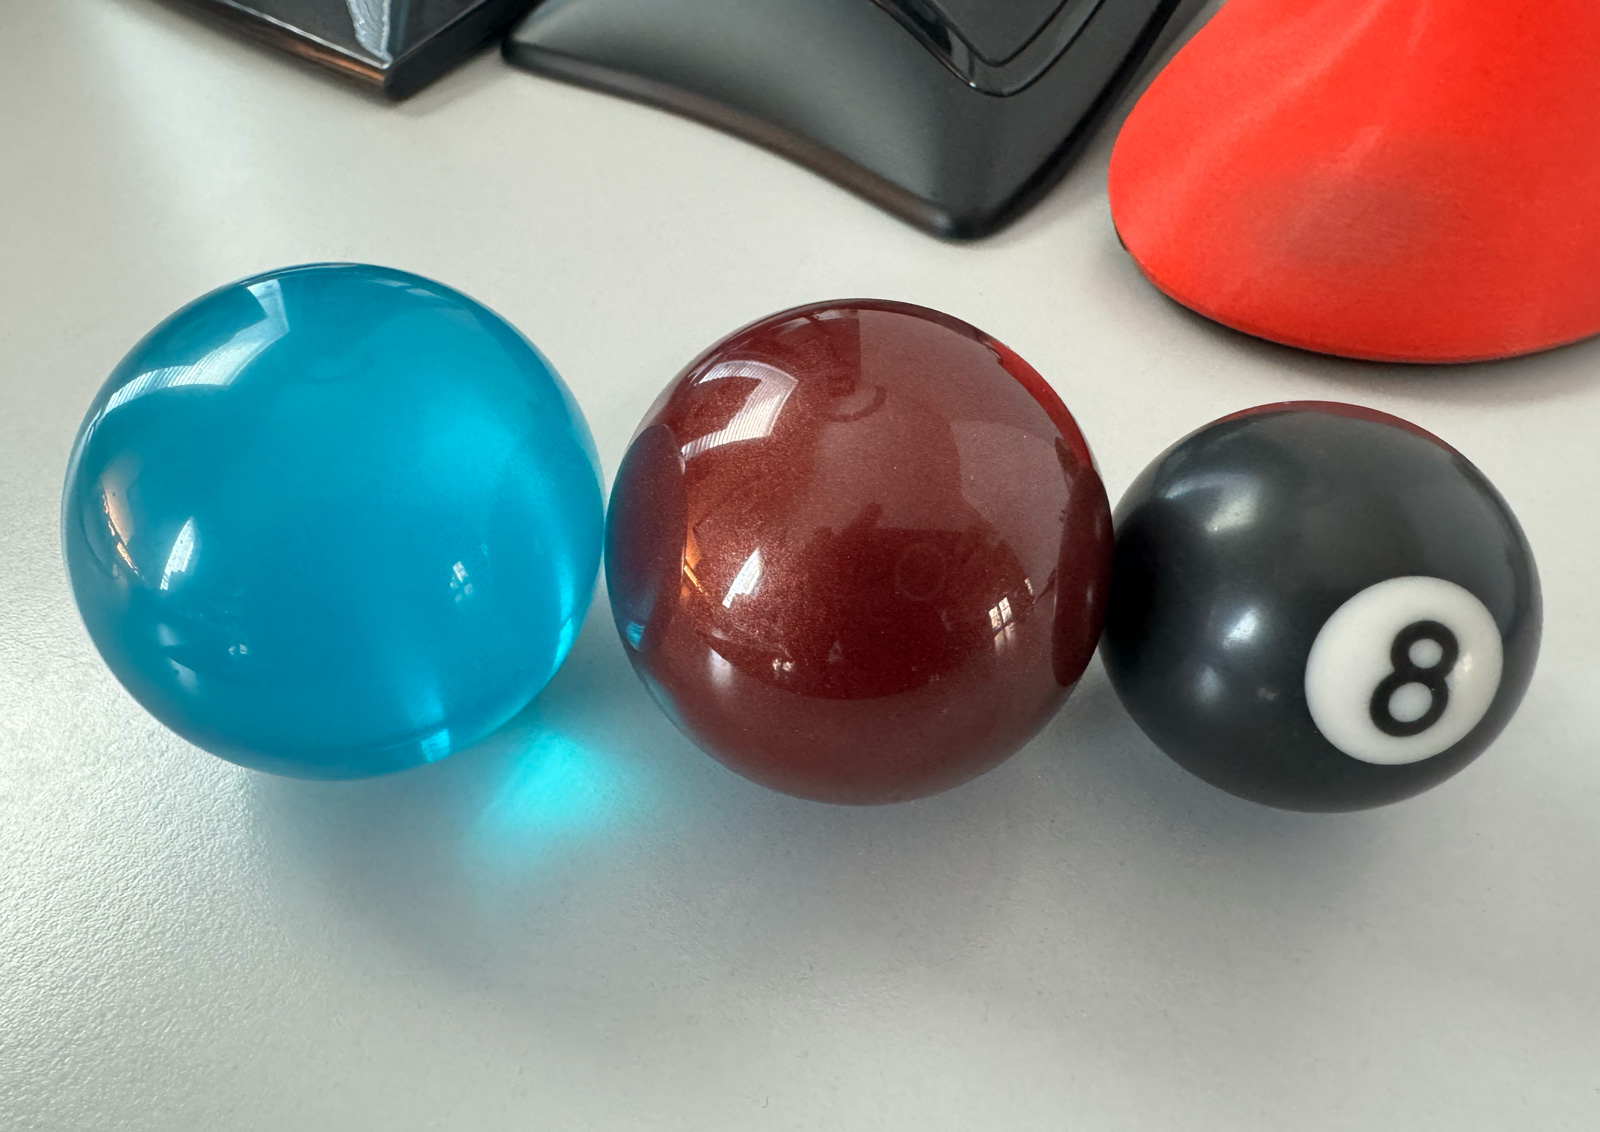
Compare the ball sizes of the CST2545 (left), Kensington SlimBlade/Expert (middle) and the Ploopy Classic (right)
photo © TrackballMouse.org
First impression – using the Ploopy trackball
As you may know, I’m a big fan and long-time user of the bigger, finger-operated trackballs, like the Kensington Expert, Kensington SlimBlade and the CST2545 (now X-Keys L-Trac). And twenty years ago when I started with a trackball, I used the Logitech Marble trackball.

My favorite trackballs of all time, from left to right: the Kensington Expert, Kensington SlimBlade Pro, Ploopy Classic and the CST2545 (X-Leys L-Trac)
photo © TrackballMouse.org
So knowing that, you can judge for yourself how you would fare, but with those trackballs as my main experience, using the Ploopy was instantly successful. The hand position is comfortable, on a little angle, and my palm rests very nicely on the body of the device. The ball has a very decent 45mm size and is easily reached with the middle fingers. The other fingers naturally hover above the buttons left and right.
The device and texture feel surprisingly pleasant. The texture of the body is fine enough that it doesn’t leave any marks on your hands, but rough enough that it offers a good grip – your hand won’t slip off this device.
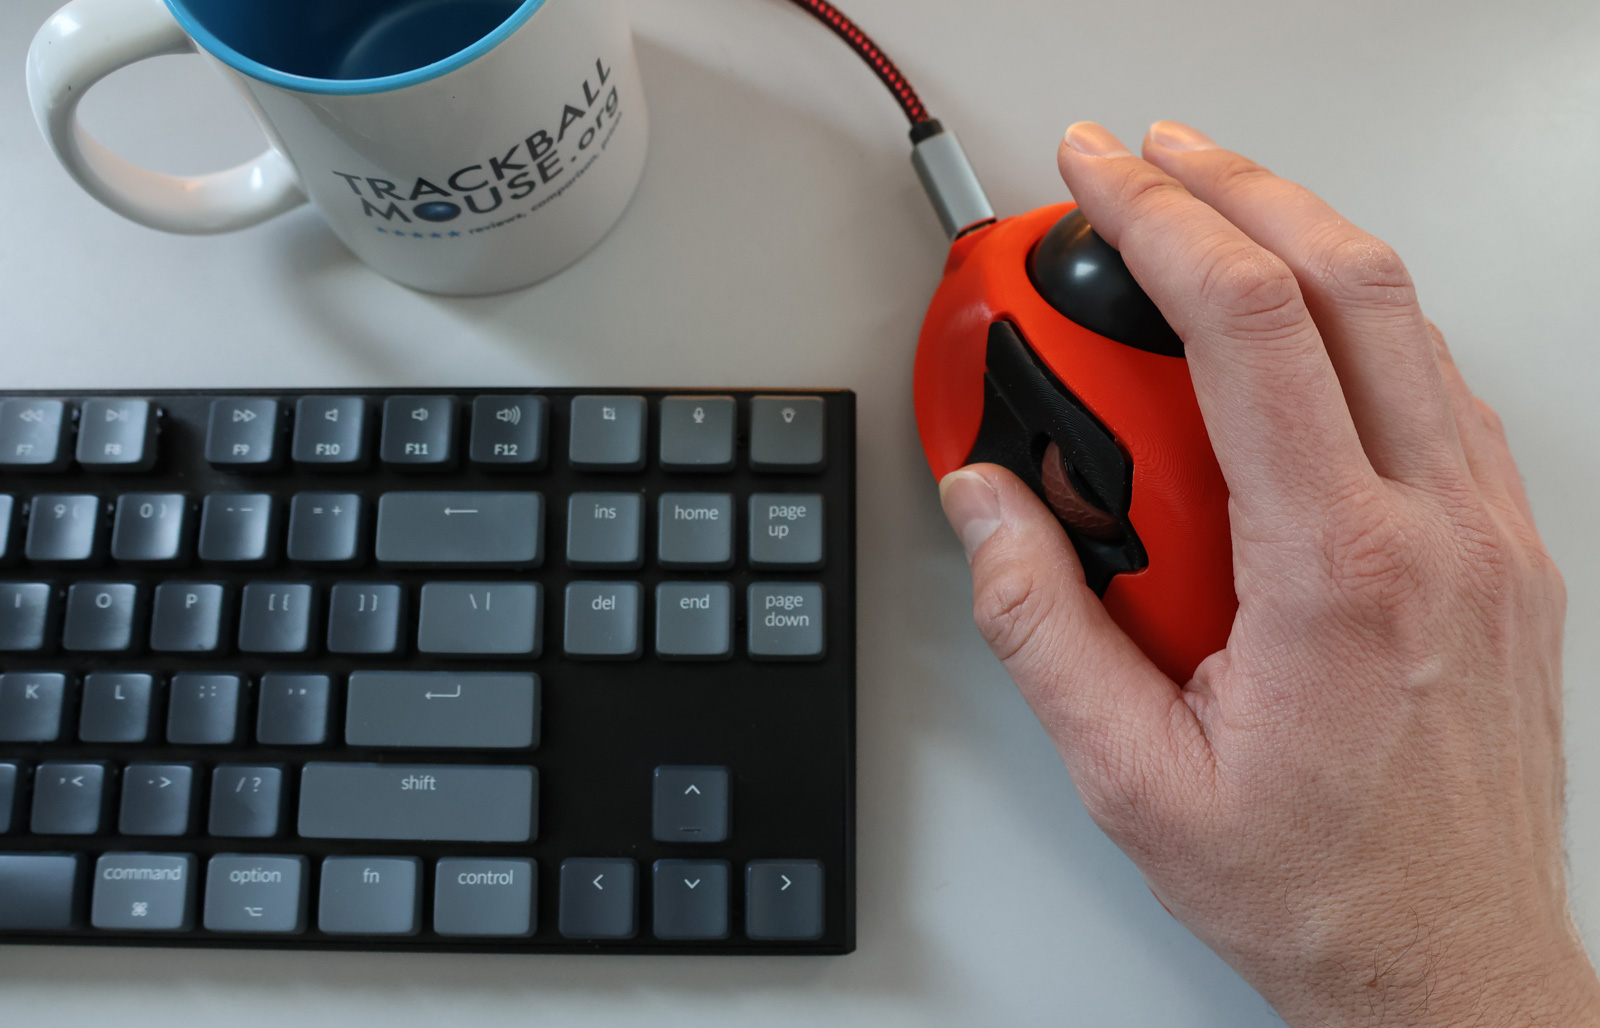
I find the Ploopy Classic very comfortable for the hand. Pictured here next to my Keychron K1 wireless RGB keyboard.
photo © TrackballMouse.org
The 3D feel of the device is different, not bad at all, very comfortable even, and the 3D texture is a badge of honor (not mass-produced but custom 3D printed) but if there was a smooth version with more solid colors available, I would probably go for the smooth one, purely for the looks.
Now there are a few things I had to get used to: first the scrolling wheel. You need to scroll with your thumb, which is something I never did before. The button above the scroll wheel is set by default as the right-click, so you need to use your thumb for that button as well as the left click, which is the button below the scroll wheel.
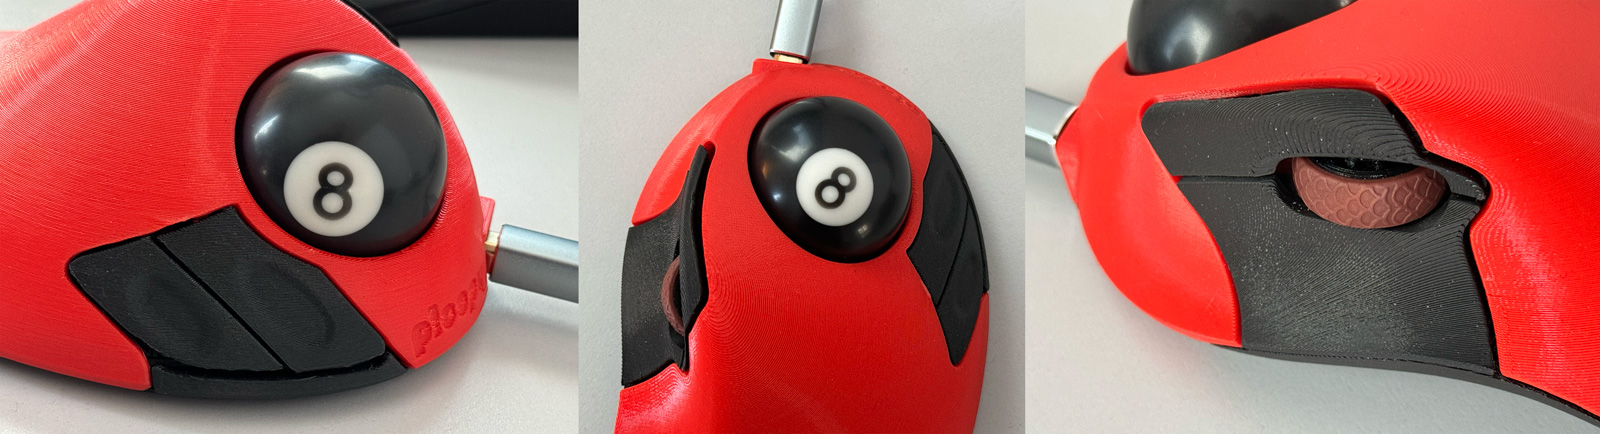
The buttons of the Ploopy Classic: two buttons on the right, two on the left and the scroll-wheel is clickable too, making 5 buttons in total, all customizable.
photo © TrackballMouse.org
The buttons on the right of the ball are by default set to “Back” and “Forward”. Now this takes some getting used to. Update: I assigned new features to those right buttons to right-click which is more natural for me. More on assigning buttons below.
I can easily work with this device instantly, which is not the case with every trackball. Some trackballs just never feel right, or take some determination to get through a long process of changing your ways, but not the Ploopy.
Plug and play, baby!
Ball and tracking
The Ploopy Classic ball measures 45mm. That is 1mm bigger than the 44mm ball from the Microsoft Explorer but smaller than the Expert and Slimblade ball (55m).
I’m used to the bigger balls from the Expert and SlimBlade, but the Ploopy works great and is the perfect size for this device, it doesn’t feel too small.
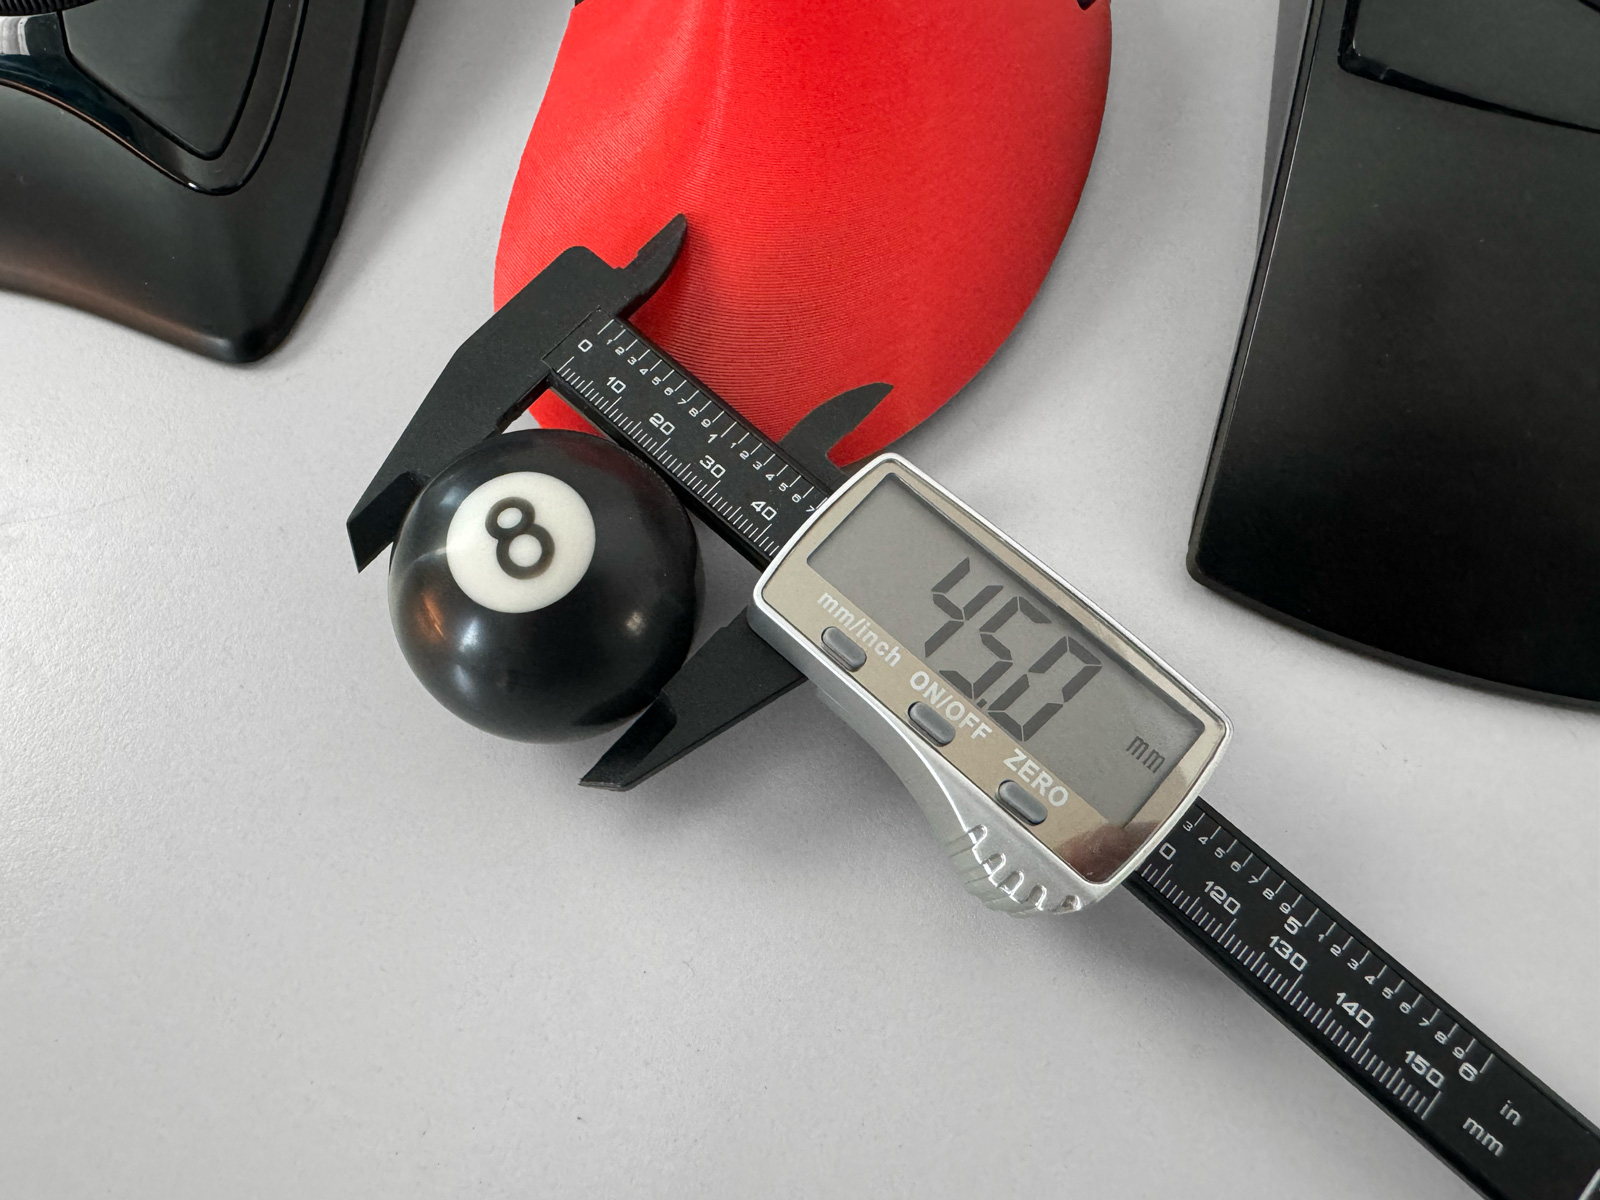
A 45mm ball, which is a bit smaller than the Expert and SlimBlade, but bigger than most trackballs
photo © TrackballMouse.org
The tracking (cursor control) is excellent. Really good indeed. The cursor moves a bit faster than my normal preferred speed. I could have easily changed the cursor speed in my Apple macOS settings but I actually gave it a try and got used to it quickly. I have a large 27” Apple Studio monitor so the speed is perfect for fast work and the control is subtle enough for detailed work as well.
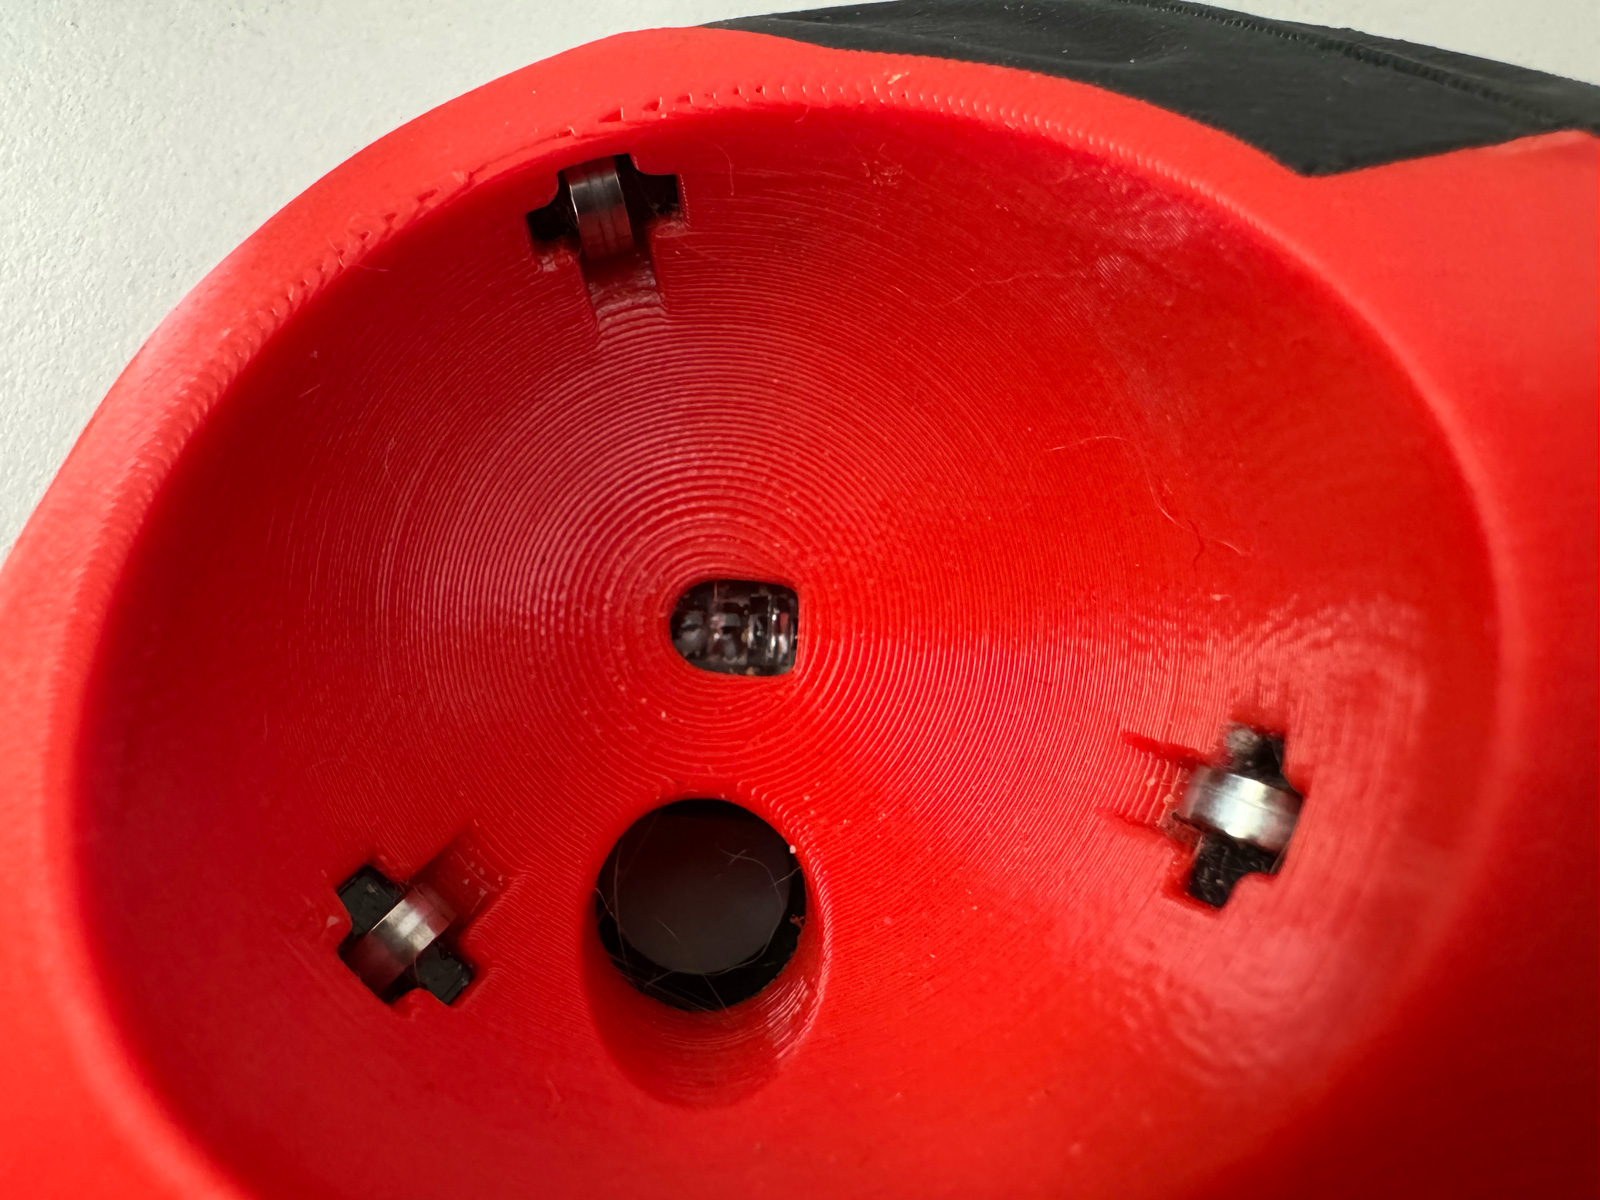
The metal roller bearings make the ball roll very smoothly
photo © TrackballMouse.org
The metal roller bearings on which the ball rolls are cool looking and super smooth but they are not very silent. You hear the mechanical wheels turning and moving, it’s much louder than my SlimBlade for example. When moving the ball slowly it’s not so loud at all, but if you really give the ball a big turn or move intensely (if you would be a gamer for example), then it gets pretty loud.
More about the Buttons
The buttons are well placed, although I had to get used to them for a bit. The left click has a very nice and subtle click and is easy to press. The scroll wheel acts as a button when pressed. On the right side there are two more buttons.
I’m not someone who needs a lot of buttons and I find myself only using the left-click and right-click. But for people that want more buttons, this Ploopy offers plenty – and they can be assigned – read more below.
Assigning buttons
So after using it for a few hours, my main concern is still the right-click. So far it has been plug and play, but I need to download something with which I can assign the right button to do a right click.
Now where’s that manual? O yeah, there’s not a manual that comes with the device. I go to the Ploopy website and there’s not a documentation section. A few Google searches later I find myself on a GitHub page: https://github.com/ploopyco/classic-trackball This is getting real! Open source is not for everyone, I’m out of my element here. I only want to change one button to a right-click. How am I going to do this?!
QMK assigning the right-click to the right button
But then I learn on the GitHub page and after an email from the Ploopy founders, that assigning buttons is super easy! As of November 13th, 2020, kits bought from the Ploopy store come with QMK preloaded. Some of you may be familiar with QMK, but in case you’re not: QMK is firmware preloaded on the device and accessible via your browser or computer.
To access the settings use Microsoft Edge or a similar browser that has WebHID enabled, and navigate to the UseVIA app website. There, you can easily change the button assignments, including setting one of the buttons as a DPI changer for example.
If anyone wants to assign the right-click to the right button, this is how you do it: take a look under “Special”; you should see “Mouse Btn2”, which is the right click. Assign it to one of the buttons on the Right.
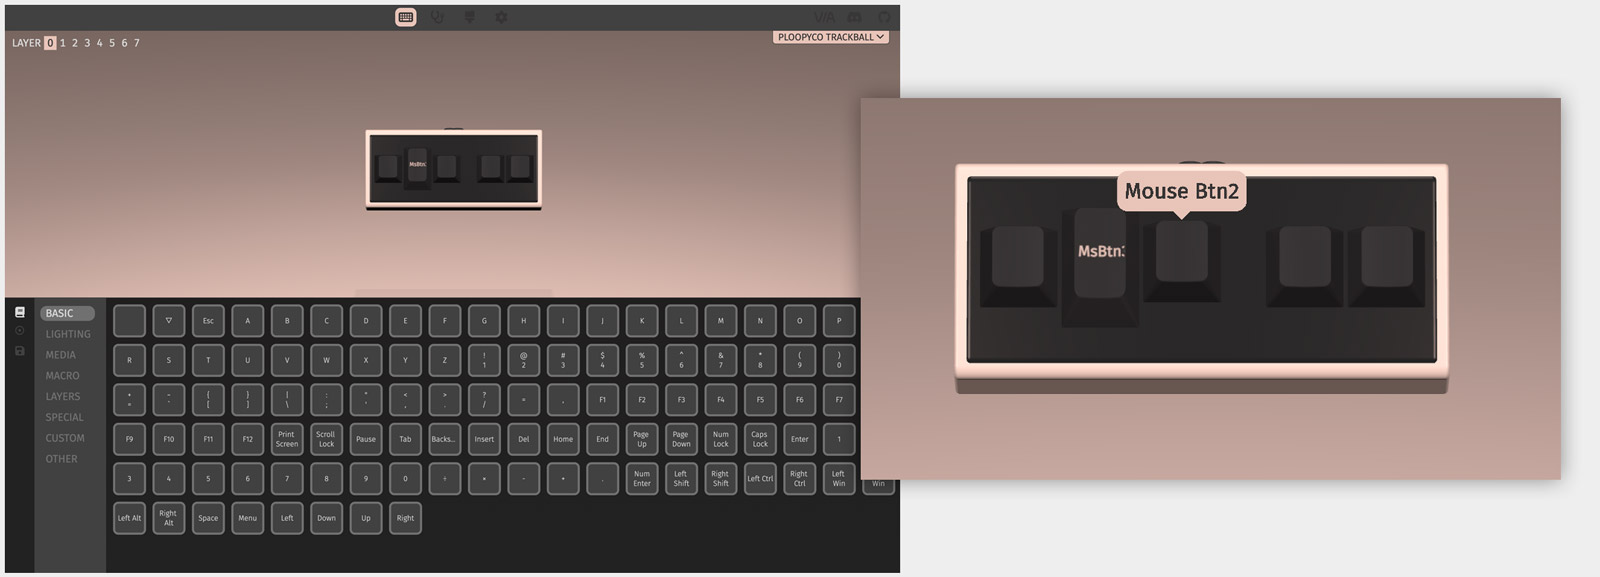
To enable the DPI switch, look under “Custom”; you should see DPI Config, which will cause one of the buttons assigned to cycle the DPI between three different modes.
After setting the buttons the Ploopy is perfect and I have used it for several months now to really get to know this trackball.
Scrolling – a minor issue with this trackball
For me, there’s only one downside of my Ploopy trackball and that is the scroll wheel. It does work pretty well, but for long web pages or other long scrolling, it just doesn’t always pick up the scroll when you move the wheel. It does it well if I use it carefully and slowly, but when I just want to go fast I find myself going to the sidebar of the browser to just drag the scrollbar down to scroll. That’s not ideal of course. It’s not a complete turn-off of the Ploopy but it is a concern that should be addressed. Especially when the scrolling on the CST2545 is so incredibly good, and the Kensington Expert wheel and even the SlimBlade twist-the-ball scrolling work great.
For example, I can scroll all the way up or down a 7-page Pages file with two quick twists of the SlimBlade ball (even one twist if I really try), but the Ploopy takes more than 5 thumb movements.
The scroll wheel of the Ploopy Classic: it works well but is not fast.
photo © TrackballMouse.org
I’ve been using the Ploopy daily for a few months and I somehow don’t remember this being a problem in the first few weeks so I wonder if the scroll wheel just started acting differently over time or if this was always an issue but I didn’t notice it at first because I was getting used to the new trackball. I checked out some other reviews of the Ploopy and the issues with scrolling do get mentioned so I assume it’s not just my trackball.
Another general issue of scrolling with your thumb is that it makes it hard to hold-and-scroll (drag and drop while scrolling). The position of the scroll wheel is not ideal for the classic hold (drag a file) and scroll, since you need your thumb for both the left-click as well as the scroll wheel. This problem is not unique to the Ploopy but the CST2545 / Expert don’t have this problem because of their different layout (the SlimBlade actually has a similar problem where a file gets dropped when you start scrolling).
Conclusion
| 4.5 / 5 |
Overall I’m extremely impressed by the Ploopy Classic trackball. Even though I have been using Trackballs for almost 25 years, I didn’t use the famous Microsoft Explorer trackball much, so I came into this without any expectations. This Ploopy trackball blew me away with the comfort on the hand and the brilliantly smooth ball movement.
The main issue is the scroll wheel that is not always scrolling as fast or far as it should (missing or slow movement, especially when you turn the wheel fast).
Another downside is the price. While perfectly justified, it is a lot of money that for some people is just too much. I would say though, that buying good gear that you basically use for hours a day (like a keyboard, trackball, monitor, office chair) is money well spent. Just buy a a little less Starbucks coffees or order one less pizza and you won’t notice the difference in your bank account at the end of the month.
Usually after receiving a new trackball for review I quickly go back to using either my trusted Expert, SlimBlade or CST2545 but this one just stayed on my desk, and still IS!


Pros
Ploopy Classic Trackball
- Super smooth and precise ball movement
- Very comfortable body shape
- 5 button customization
- 4 DPI settings (400, 800, 1200, 1600)
- Easy to clean
- Lots of customization options
- Open source software
- Easy button customization via QMK Firmware
- Left-hand model available
Cons
- Scrolling could be better
- No wireless model available
See more features and specifications on the Trackball Comparison page
| $155 (CA$209.99) Assembled | ||||
| $100 (CA$45) Full Kit |
| $155 |